
How to Successfully Bud Graft Citrus Trees
This step-by-step guide shows how to bud graft citrus trees by chip budding, including little-known tips to help you succeed.
The chip bud is useful for grafting any kind of citrus tree including: oranges, mandarins, lemons, limes, grapefruit, pummelos, and kumquats.
Bud Grafting Citrus Fruit Trees — YouTube Video
In addition to this step-by-step guide, I have also made a YouTube video (see below) showing the bud grafting of citrus trees.
Citrus Grafting with Disease-free Budwood
When grafting citrus, the most important thing is to use budwood that comes from a tree that has been tested and shown free of disease. Huanglongbing (also called HLB or citrus greening disease) is the worst of all citrus diseases and spreads rapidly in part because trees typically do not show symptoms for years after they have been infected. Citrus greening kills trees and there is no cure. An infected tree may look healthy and can spread the disease via either an insect vector such as the Asian Citrus Psyllid or via grafting with infected budwood from the tree. All citrus producing counties in Florida have been devastated by the disease and it has started to spread rapidly in Texas. In 2012 the first infected tree in California was found in Los Angeles. Scientists had predicted that the disease would spread, and in 2015 more infected trees were found 15 miles away from the first tree. Citrus greening is now also a threat in Continental Europe due to the recent discovery of the African Citrus Psyllid, another vector of the disease, in northwestern Spain and northern Portugal. Australia is also on alert and has begun monitoring for psyllids.
Disease-free Budwood Readily Available
The Citrus Clonal Protection Program (CCPP) distributes citrus budwood of hundreds of varieties. It is easy to order online and budwood for citrus grafting is distributed every month. Anyone can request an account. Please see the following link to set up an account and order: CCPP. The below YouTube video goes through in detail the process of setting up an account and placing an order.
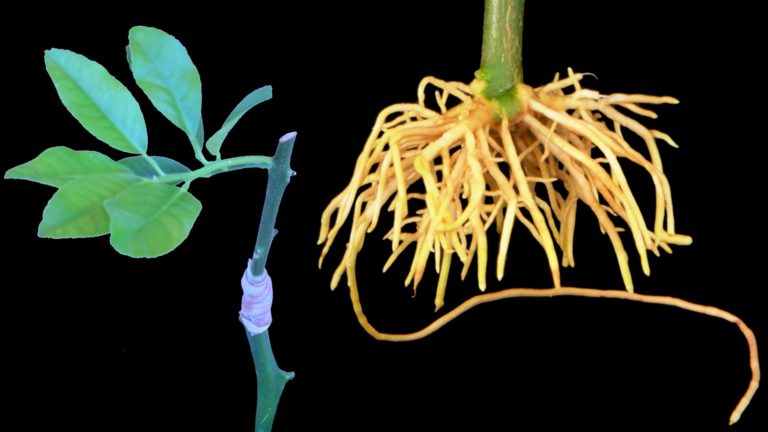
The citrus variety that I am grafting in this tutorial is a new pummelo grapefruit hybrid called Rojo Blanco. Although quite sweet and delicious, Rojo Blanco is not yet well known and thus trees are unavailable in nurseries. If Rojo Blanco trees were available, I would much prefer to buy one from a local nursery. Since they are unavailable to buy, I budded a tree using budwood ordered from CCPP.
Bud Grafting Citrus Trees Using the Chip Bud rather than the T-bud
My favorite technique for bud grafting citrus trees is the chip bud. T-budding seems to be the most common method for budding citrus, but I have found many advantages in using the chip bud rather than the T-bud. With the T-bud, it is important that the bark of the rootstock be slipping and easily peeled back. The condition of the bark is not so important when using the chip bud; the chip bud can be used whether or not the bark is slipping. With the T-bud, the rootstock must be of a certain diameter to be able to peel the bark back and insert a bud. The chip bud can be used with a rootstock of smaller diameter that would be difficult or impossible to T-bud. Another nice thing about the chip bud is that the same parafilm that I have on hand for other grafts is all that is needed to wrap the bud; with the T-bud, some other material would be needed to wrap the graft tightly enough to keep the bark from lifting.
Useful for Grafting to Rootstock or as a Backup Graft
I find the chip bud most useful for budding a new citrus tree or for grafting a backup graft underneath another graft such as a bark graft. I do not use chip budding when topworking a citrus tree in the ground as it can be difficult to get the bud to start growing.
Grafting to Rootstock
As a Backup Graft
In the below YouTube video I show bark grafting of a citrus tree. Citrus grafts are more prone to failure than grafts of other types of fruit trees such as apples and stone fruit. In case a scion graft such as the bark graft or the cleft graft fails, the chip bud can be used as a backup graft underneath. Even when grafting only with the chip bud, it is easy to graft two buds instead of one for a greater chance of success; one bud can be grafted underneath another.
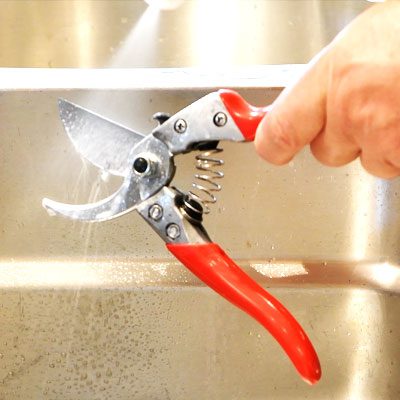
Disinfecting Tools
In order to both maximize the probability that the graft lives and also to prevent the spread of disease from tree to tree, it is important to disinfect grafting tools between grafts. To learn more about disinfecting grafting tools, please see the following link: Disinfecting Tools.
Selecting the Bud to Graft
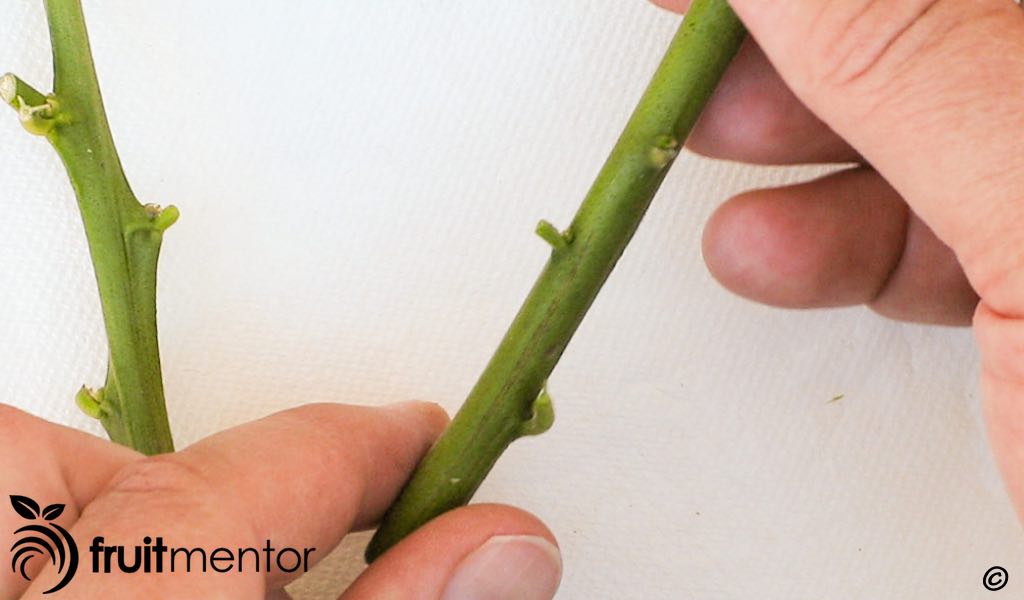
Often there will be budwood of different shapes from which to choose a bud. In this case, the package that I received from the CCPP included both round budwood and also triangular-shaped budwood. I like to use the triangular-shaped budwood when chip budding. I find that the buds can be cut smaller. This is especially useful when grafting to small diameter rootstocks.
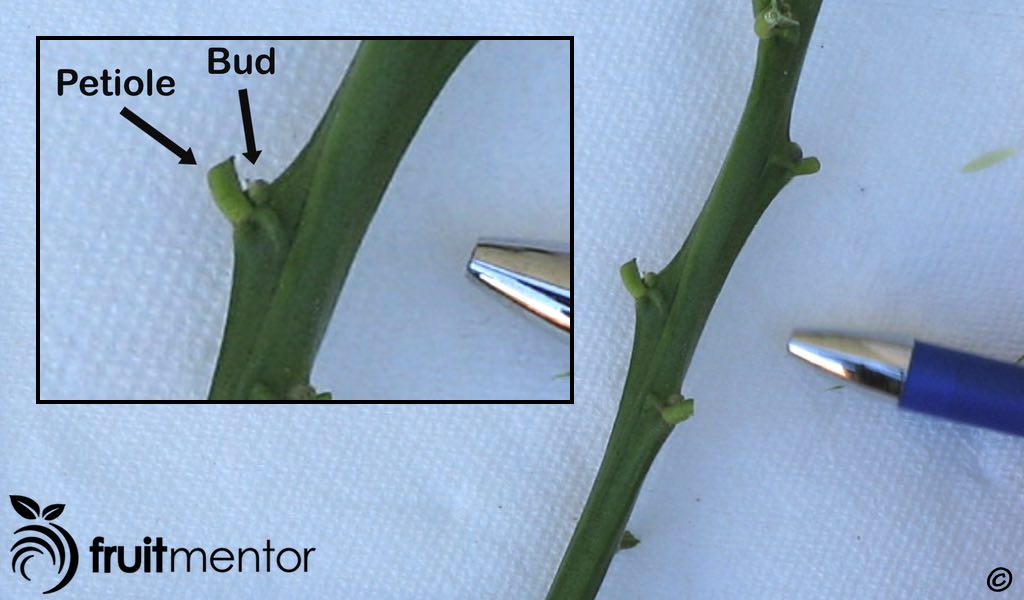
Use Petiole to Avoid Touching Cut Surfaces
If there is a petiole still attached, it can be used as a convenient handle for holding the bud after cutting. It is important to avoid touching the cut surfaces and this can be avoided by holding the bud with the petiole. I like to choose my bud before cutting into the rootstock. I have marked my chosen bud with a pen.
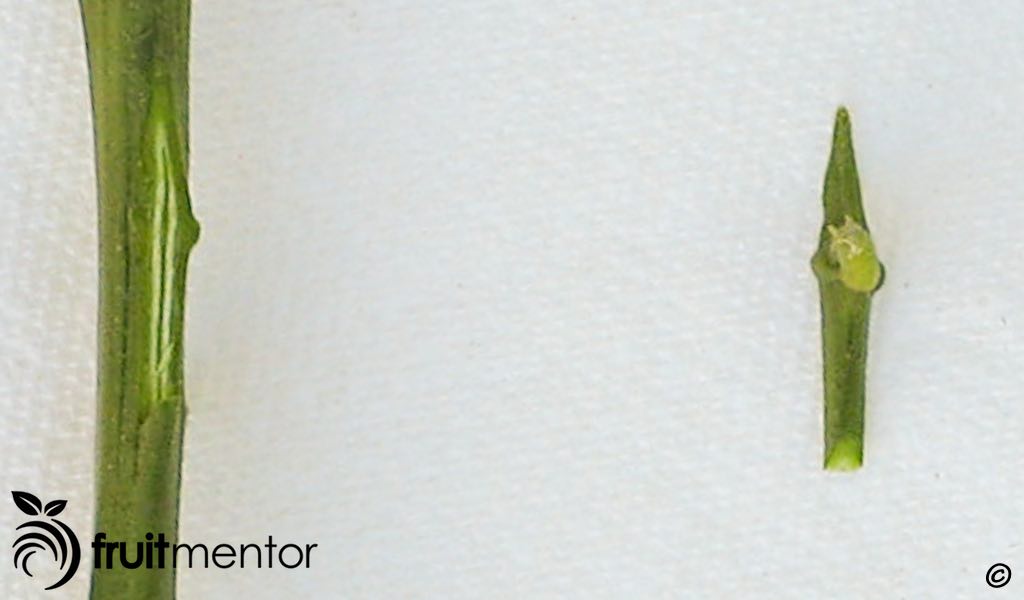
Cutting the Rootstock
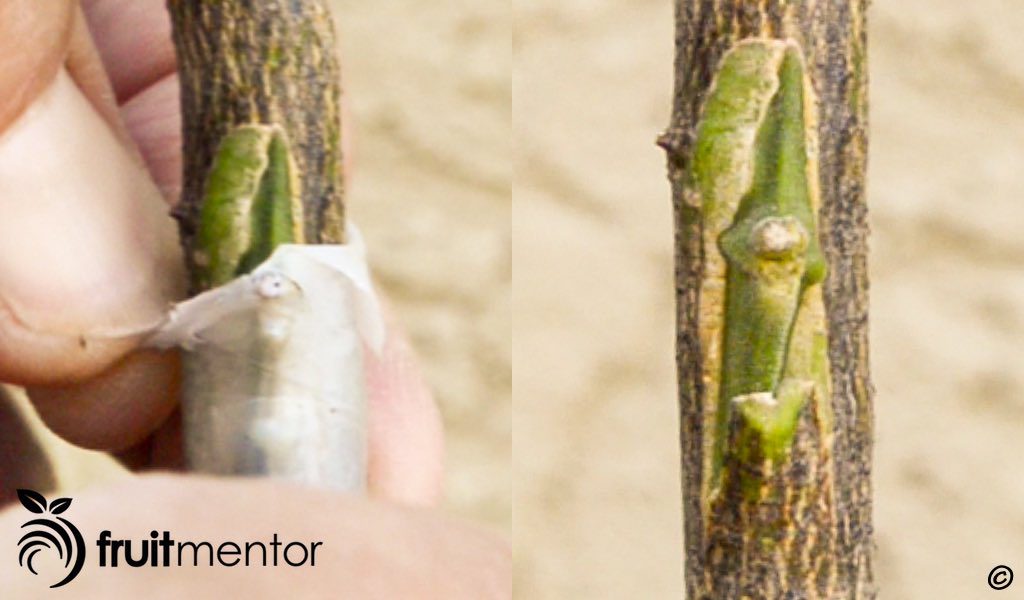
Here I prepare a place in the rootstock where the chip bud will go. I cut off some of the bark in the shape of a chip bud. I also leave a flap of loose bark under which the bottom of the chip bud will be tucked.
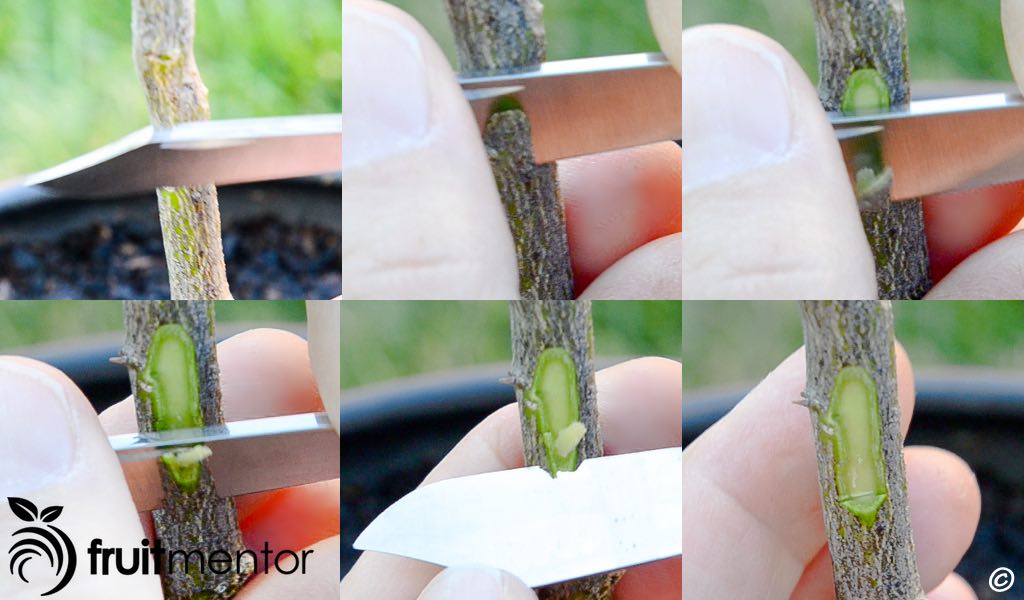
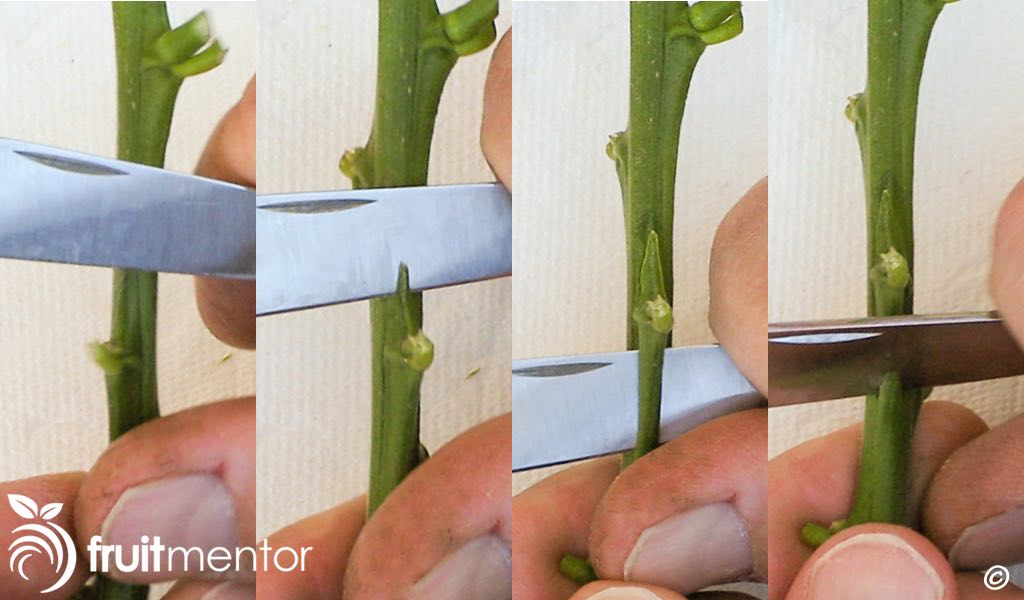
Cutting the Bud
To cut the bud I cut into the wood above the bud. I cut down past the bud further than needed for the length that I plan to use. I then pull the knife back up and out without cutting all the way through and detaching the bud. To detach the bud, I make a second cut at an angle. The second cut leaves a cut surface at the bottom of the front side of the chip bud.
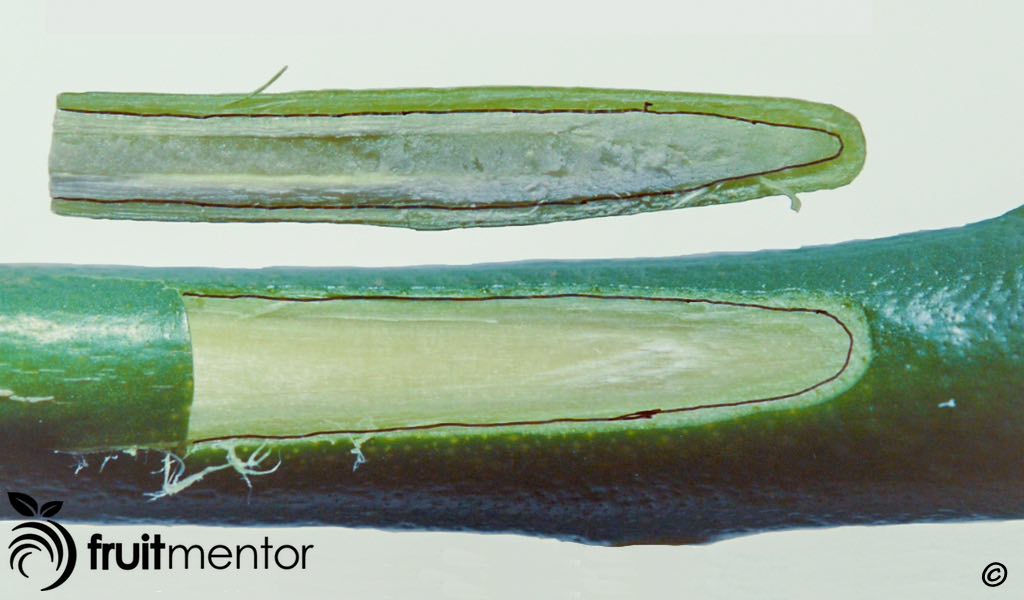
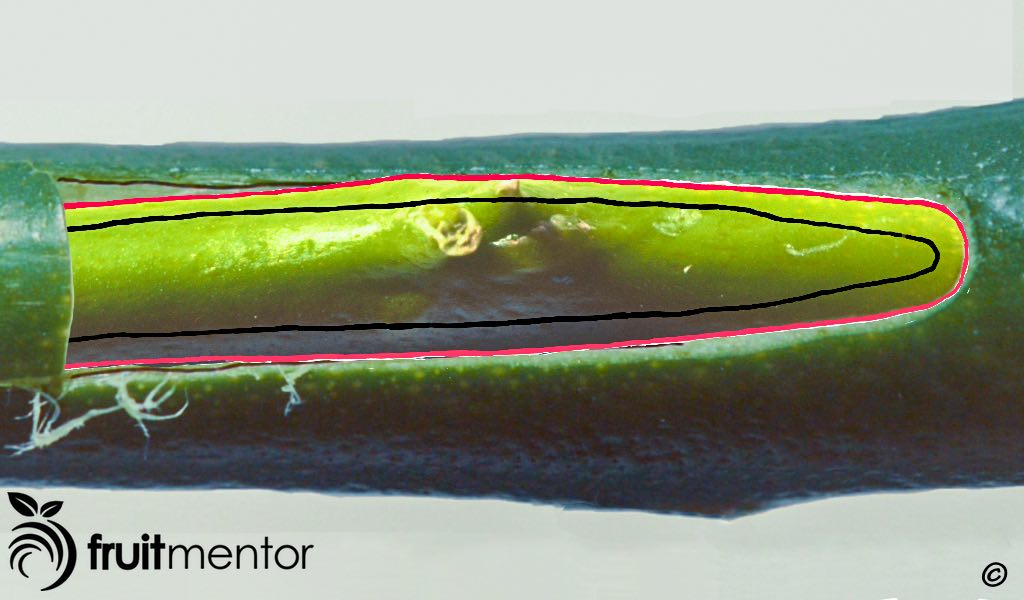
Secret to Success: Aligning the Cambium Layers
Before I show the graft of my Rojo Blanco bud to my carrizo rootstock, I am going to show a few illustrations that reveal the secret to making this graft work. The key to success in any grafting technique is to connect the cambium of the scion with the cambium of the rootstock. The cambium layer is a thin layer of tissue between the bark and the wood. In the below illustration, I have traced the cambium layer with black pen. For this type of graft to succeed, we would like the cambium of the chip bud to touch the cambium of the rootstock in at least one place.
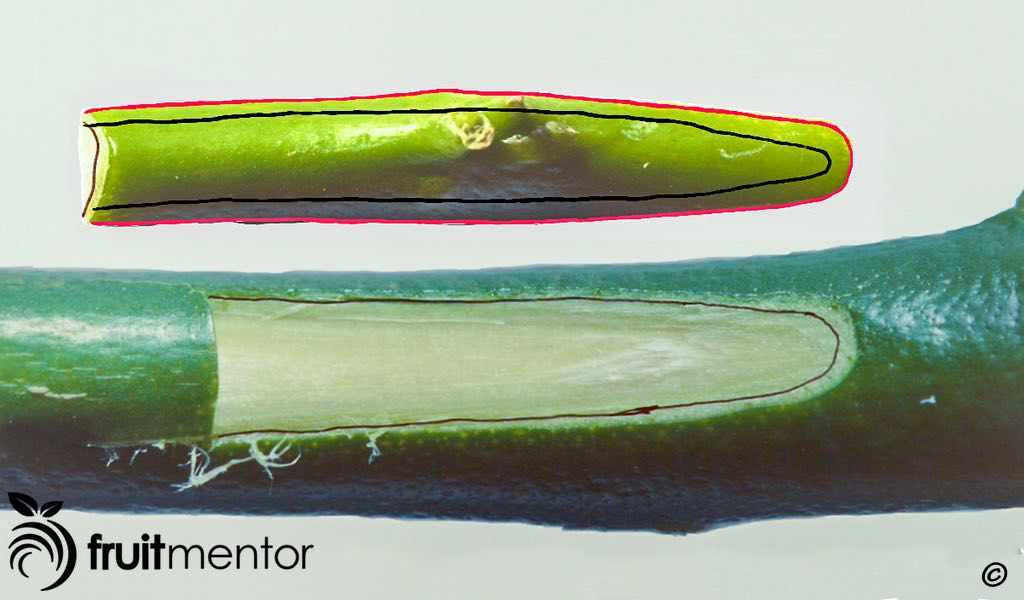
Cambium Layer from Front
In the below illustration, I am showing the front of the chip bud. The location of the cambium layer on the other side is also shown.
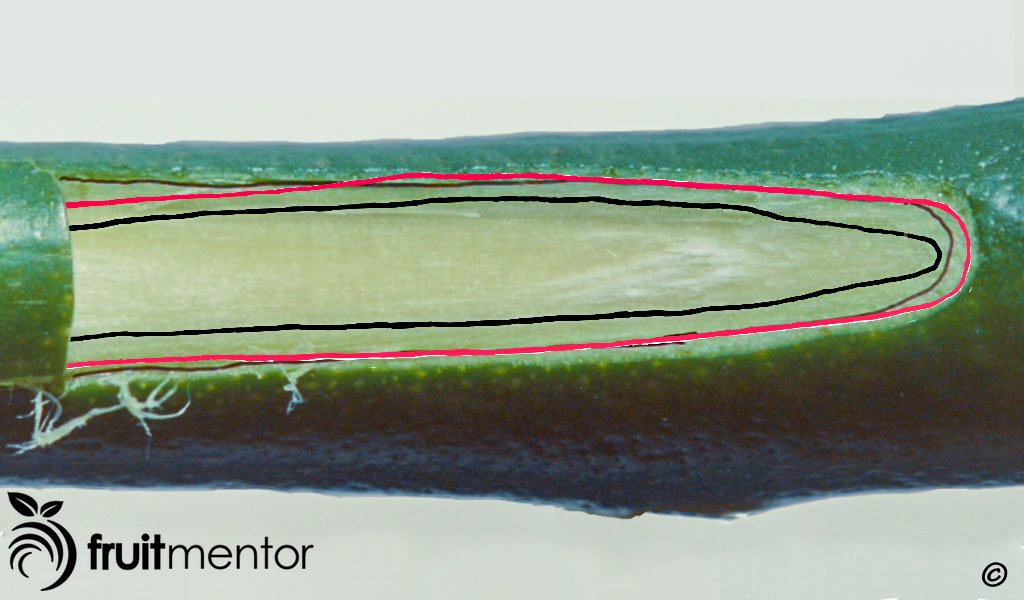
Outside of Bark Should not be Used to Align the Bud
I have seen many illustrations on the internet that might lead people to believe that the chip bud must be aligned at the outside of the bark as shown below.
Cambium Layer Not Aligned
However, comparing the outline of the cambium layer of the rootstock and that of the bud as shown below, we see that they are not touching.
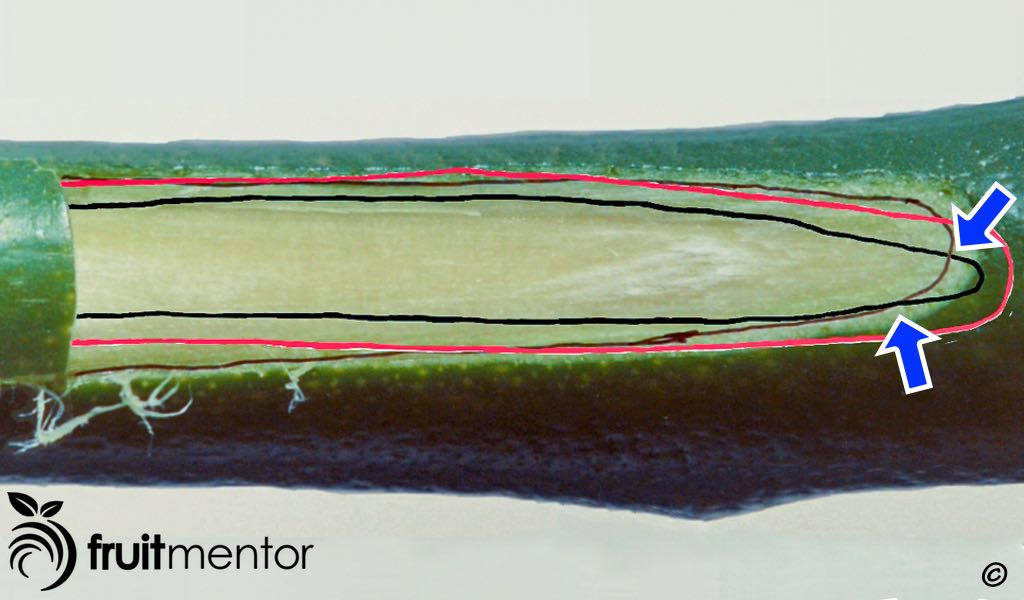
Align Bud so that Cambium Layers Touch
To have a successful graft, the cambium of the bud should touch the cambium of the rootstock in at least one point. The below illustration shows how the bud can be aligned so that the cambium layers are touching. The outside of the bark need not be perfectly matched to have a successful graft, but the cambium must be in contact. The blue arrows show two points where the cambium is in contact. Many other tutorials that I have seen suggest that a high level of skill is needed to master the chip bud and that the chip must be perfectly aligned on the outside with the cutout in the rootstock; I have found that this is not the case. I have learned that the bud does not need to be perfectly aligned on the outside and that the graft usually succeeds when the cambium layers are touching.
Inserting the Chip Bud
Here I tuck the bottom of my Rojo Blanco chip bud into the flap of my carrizo rootstock and adjust the bud so that the cambium layers are touching. The bud is a bit smaller than the wound in the rootstock, but I am able to get the cambium in contact at both the lower left and upper right.
Wrapping with Parafilm
I use half inch parafilm to wrap chip buds. The following link shows where parafilm can be ordered: Grafting Supplies. I gently pull on the parafilm and stretch it slightly as I wrap it. By pulling on it as I wrap, the cambium of the bud is pushed into contact with the cambium of the rootstock. Pulling and stretching the parafilm also makes it stick to itself.
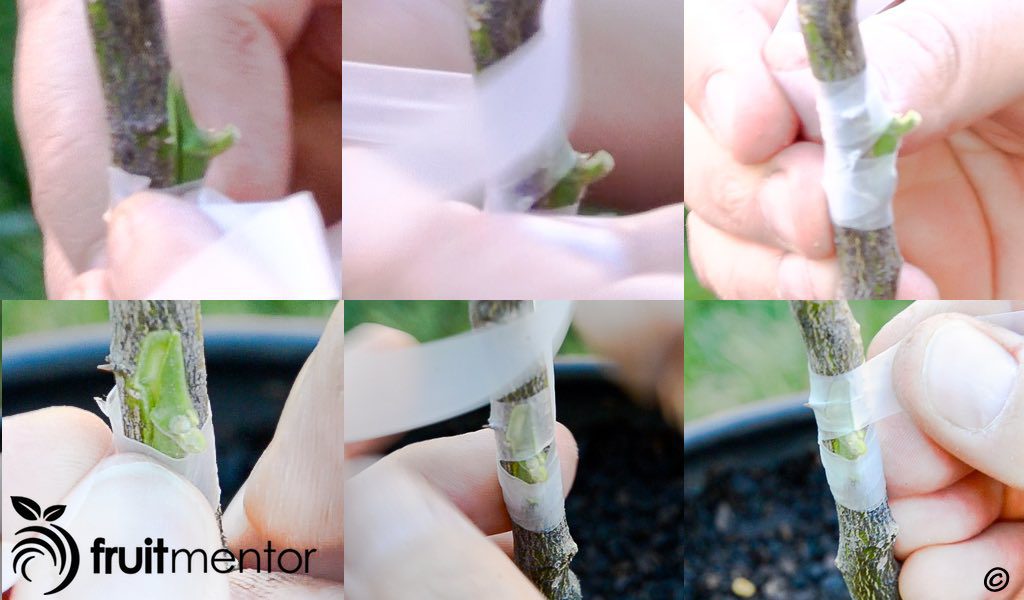
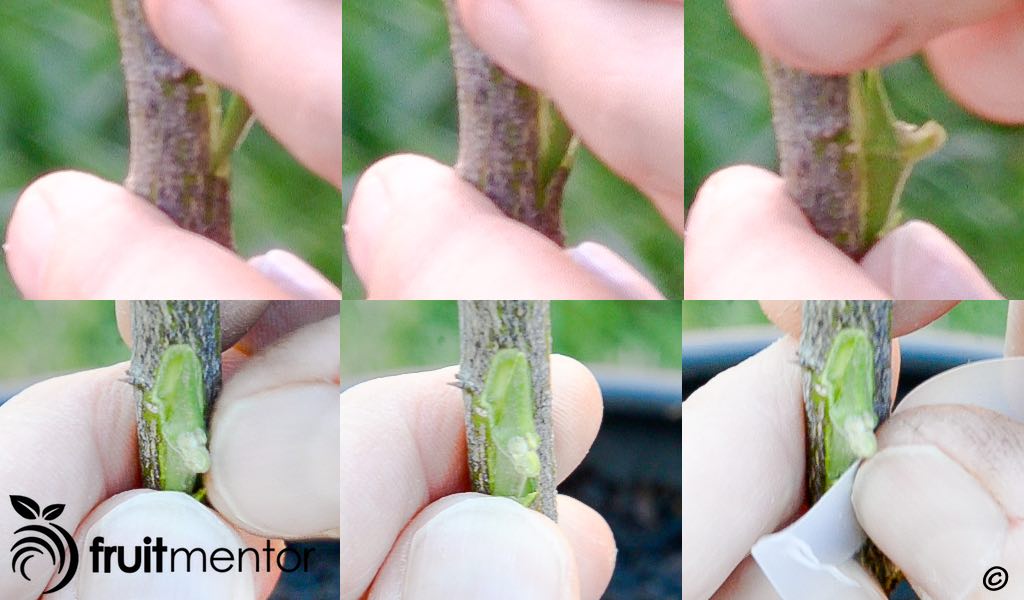
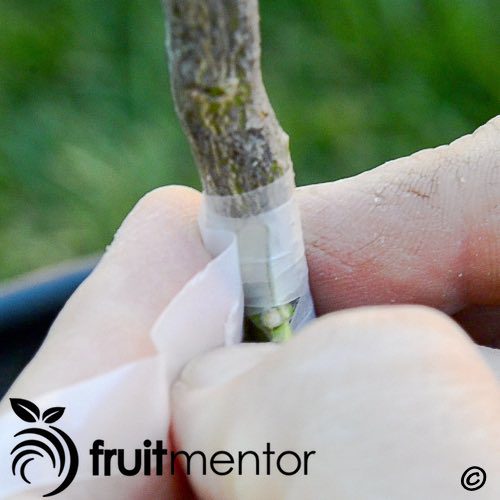
Removing the Petiole
I like to wrap over the bud, but the petiole was in the way, so I removed it by pushing it downward gently with my thumb until it broke off as shown below.
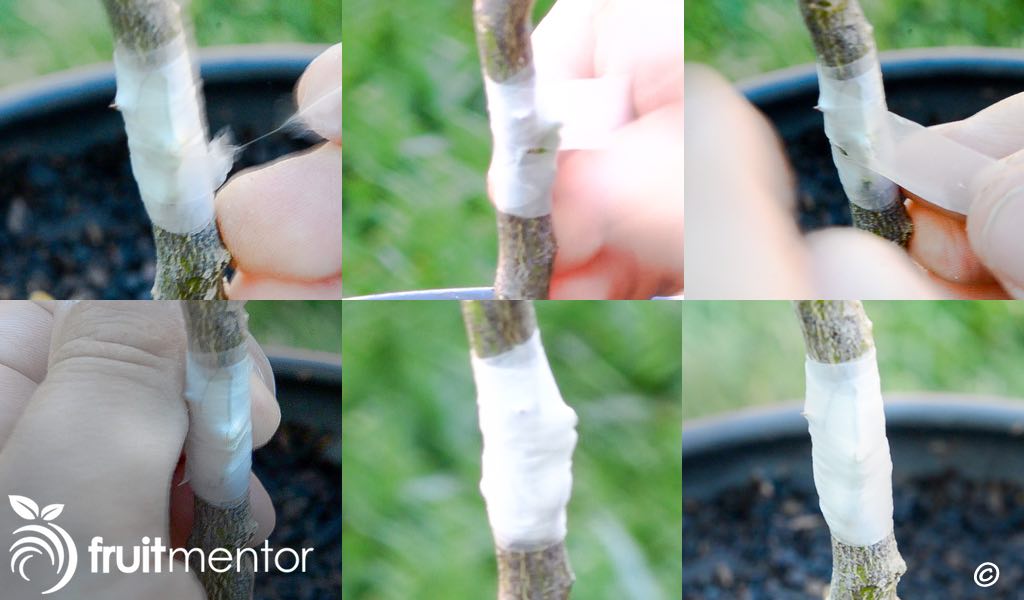
Keep Wrapping when Parafilm Breaks
When I accidentally break the parafilm, I continue wrapping over the break. I wrap until I am sure that I have a good seal all around.
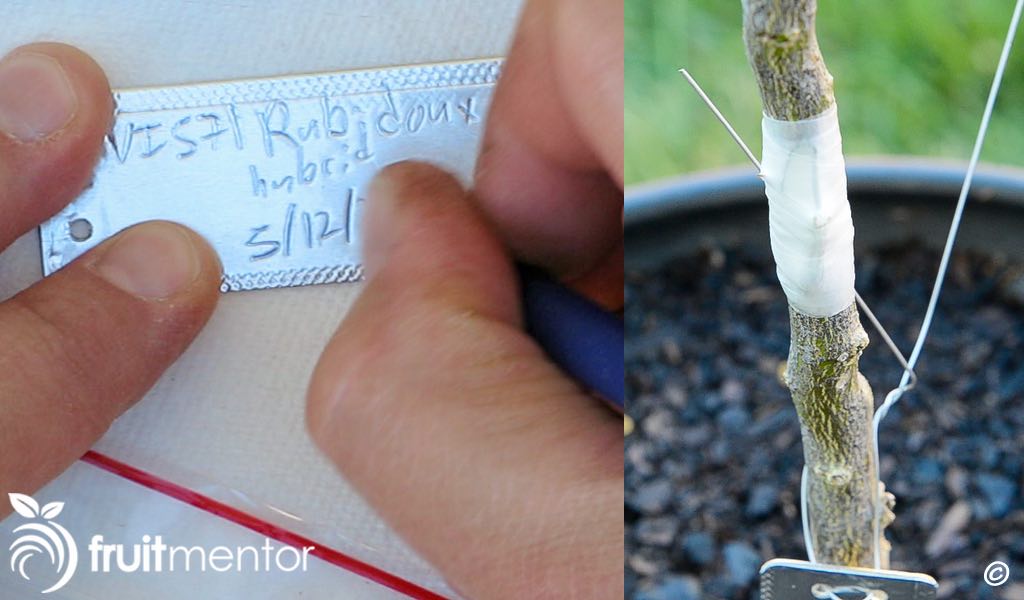
Making a Label
I always make a label to help me remember what I grafted.
Move into Shade
To avoid direct sunlight from hitting the bud and drying it out, I move it into a shady area for healing.
Unwrapping the Bud
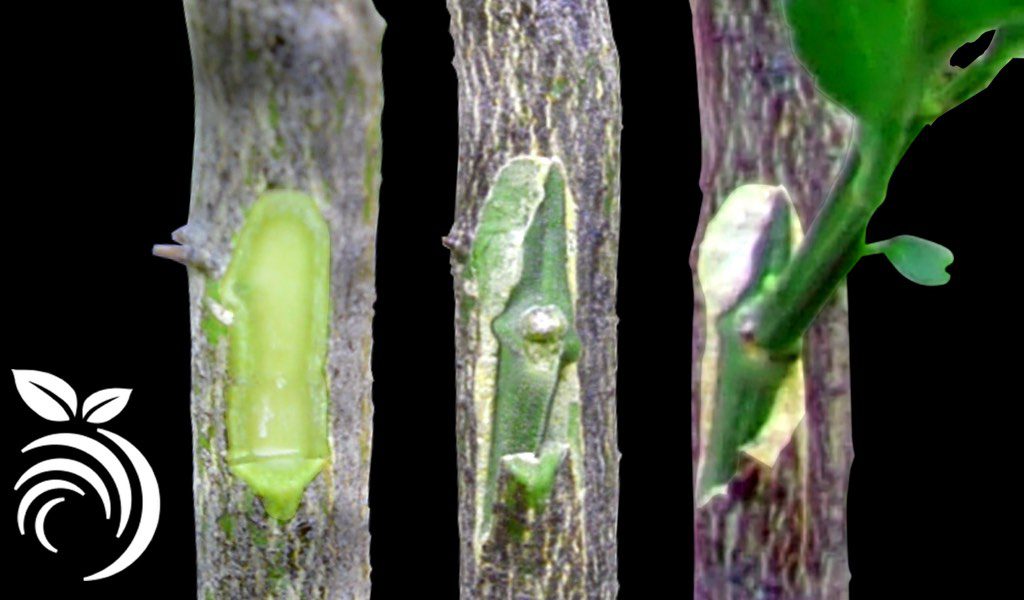
After three or four weeks I unwrap the bud. You can see below that it has healed well and that callus tissue has filled in all around the wound.
Forcing the Bud to Grow
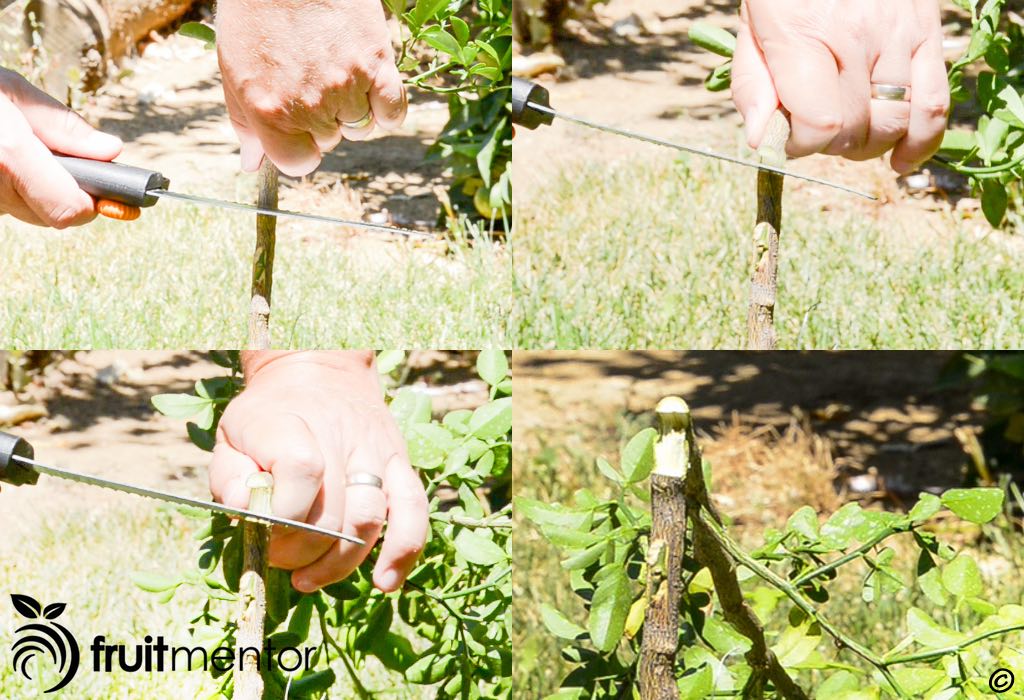
In a phenomenon known as apical dominance, natural hormones from the buds at the top of the rootstock prevent buds lower down (including the new Rojo Blanco chip bud) from growing. The apical dominance must be broken in order for a citrus chip bud to grow. I break the apical dominance by cutting halfway through the rootstock and pushing it over so that the terminal buds are lower than the newly grafted bud.
Removing the Top of the Rootstock
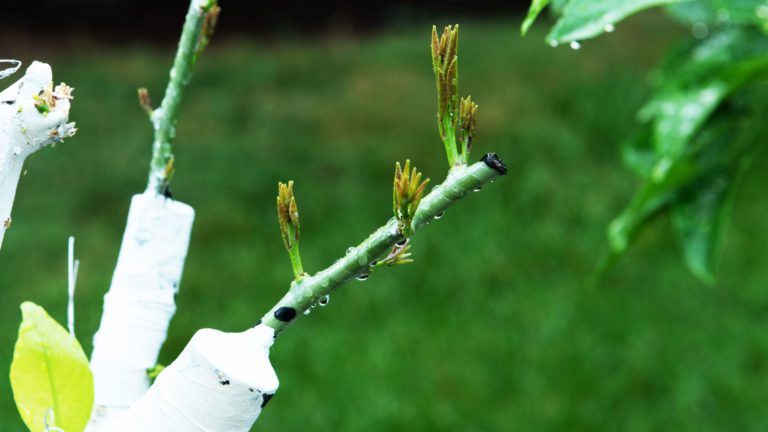
I move the tree into a sunny spot and the bud begins growing after a few weeks. When there is some significant growth from the bud graft, I cut the top of the rootstock off.
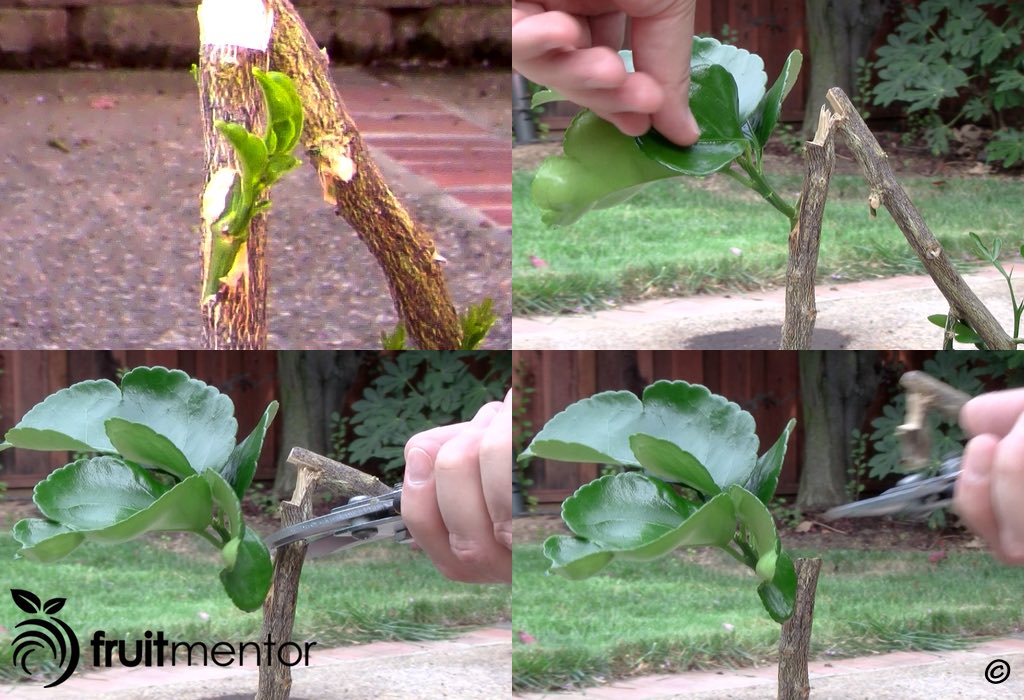
Removing Rootstock Suckers and Staking
After a couple more months of growth the tree is ready for staking. The rootstock had developed a couple of small branches or suckers that I pinched off. It is important to remove these suckers from the rootstock as they could eventually take over and crowd out the grafted variety if left alone. I stake the tree after removing the rootstock suckers.
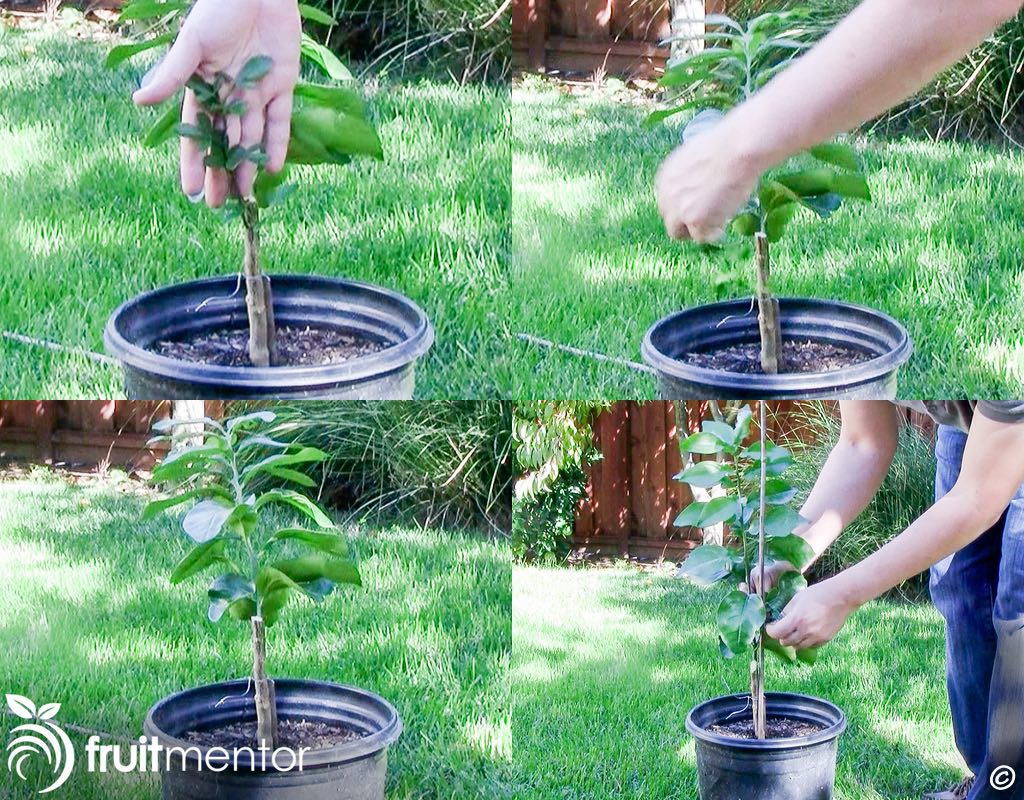
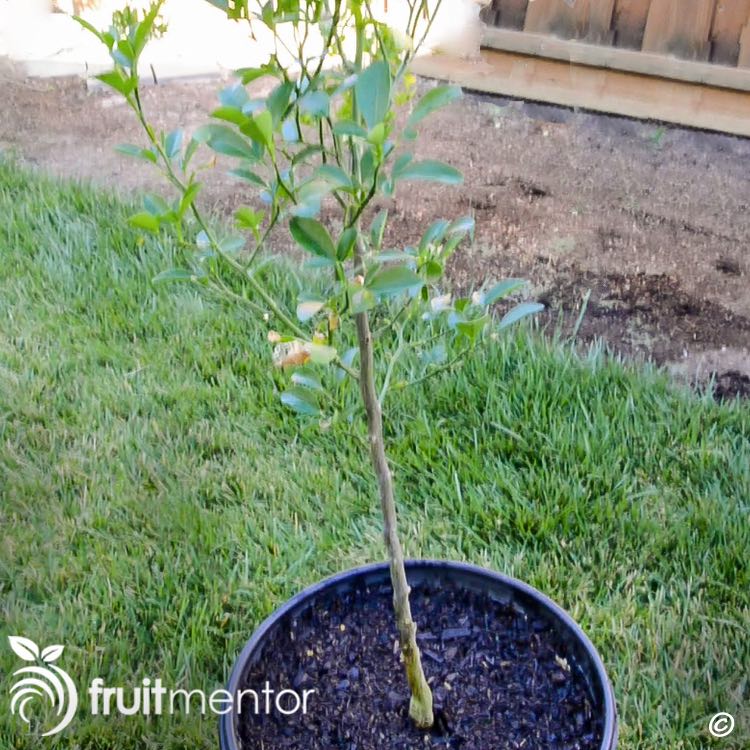
Staked Tree
Here is the staked tree. I will let it grow

Moving Trees Can be Dangerous!
In areas where insect vectors for citrus greening (i.e. citrus psyllids) are present such as California, Arizona, Texas, Florida, Mexico, and northwestern Spain, planting home-grafted trees where they are grafted will help to avoid the spread of huanglongbing (citrus greening disease) and its insect vectors. Citrus production nurseries in California are heavily regulated to prevent the inadvertent spread of Asian Citrus Psyllids and citrus greening; by law, all citrus trees are produced in insect-resistant screenhouses and are shipped to retail nurseries in sealed containers after being treated with a systemic insecticide. Once a tree is in the open air, it is a magnet for Asian Citrus Psyllids which may be carrying huanglongbing. The Asian Citrus Psyllid is elusive; it is so small that it is difficult to see it with the naked eye and can be hard to detect even when there is a heavy infestation. Because systemic insecticide washes out when trees are watered, even citrus trees in a retail nursery are vulnerable to infestation after sitting around unsold for a couple of months. Home-grafted trees are especially vulnerable to infestation and could spread both huanglongbing and its insect vectors if moved.
Please Spread the Word
Until now every place in the world where huanglongbing (citrus greening disease) has appeared, it has spread rapidly and made it so that all citrus trees die within just a few years. The few places where the disease has not yet spread are highly vulnerable. The citrus trees in these places could be quickly wiped out at the cost of thousands of lost jobs and billions of dollars, and many places with the ideal climate for citrus could be made hostile to citrus trees. In order to stop this from happening, two key ideas from this article must spread faster than the disease: (1) Graft Citrus only with disease-free budwood, and (2) the movement of citrus trees exposed to open air spreads insects and disease and is best avoided or kept to the minimum possible distance. Please help to stop the spread of huanglongbing by sharing this article and spreading these ideas. Thank you!
Other Languages
This article is also available in: Spanish, Chinese, Vietnamese, Korean, Armenian, Russian, Persian, Arabic, and Thai.
California Law Regarding Citrus Propagation
In California, the collection of any citrus propagative materials, including budwood and seeds, from non-registered sources is illegal. Any citrus trees grown or grafted in California must come from source trees registered with either:
- The Citrus Nursery Stock Pest Cleanliness Program, administered by the California Department of Food and Agriculture, or
- The Citrus Clonal Protection Program, located at the University of California at Riverside.

Excellent video… Especially the part where you color in the cambium on both bud and rootstock. Thanks for sharing!!
Thank you, Joe!
This video is the best ever. The enlarged pictures show all the details needed to guide and help us understand how to make a successful graft. Many thanks for the trouble you have taken to make this a truly worthwhile illustration.
Vivienne
You are welcome! Thank you for the feedback, Vivienne!
Do you sterilize the host citrus bark prior to cutting it for a graft? It seems strange to sterilize your tools, keep the bud cambium clean, etc., only to leave the bark of the host covered with dirt/bacteria from being out in the elements. I wonder if “gently” cleaning the host bark (and possibly the donor buds) would improve graft success?
The main concern when disinfecting the tools is making sure that there is no graft-transmissible disease accidentally spread from one tree to another. The graft may succeed even if there are disease organisms on the knife. Based on my experience I do not think it is worthwhile to clean the bark or the budwood. I actually tried that when I was a beginner and I do not think it helped.